The Corps Collector
TheCorpsCollector.com
Planet Dagobah
Materials:
4 sheets 28" -square corrugated cardboard (cut from appliance cartons-save scraps);
tissue paper, one mixed package plus gold, brown, olive green and gray;
scraps of plastic foam (save from Hoth construction);
1/4" x 1 1/2" x 8" piece plywood; scrap1/2" x 1" and 1/2" x 1 1/2" pine
scrap 1/8"-diam and 1/4"-diam dowel;
2 empty cans-one 2 1/2"-diam x 1 1/2" high, one 3 1/4"-diam x 4 1/2" high
monofilament nylon fishing line;
one 1/4"- to 1/2"-diam wooden bead;
1 screw eye;
rubber bands;
rubber grommets or brass eyelets with setter;
2 cans Slime;
one 5" x 5" x 1 1/2" plastic refrigerator dish;
permanent wide-tip markers in blue, turquoise, chartreuse, brown and gray;
clear plastic wrap;
copper wire;
rubber cement;
spray adhesive;
white glue;
super-strength glue;
two 1" pieces self-fastening tape, such as Velcro®;
wooden toothpicks;
1"-wide nylon brush;
hot-glue gun;
scissors;
utility knife.

Using spray adhesive, laminate two of the cardboard squares, crossing corrugations, and put aside. ln third square cut slot for volcano rock launcher same dimensions as plywood piece (see Plan View, above, for location). Laminate last square to one with slot, then glue plywood in slot.
Take laminated square without plywood insert and enlarge pattern for land masses, following solid lines in Plan View; cut out.
Cut several 1"-wide strips cardboard from scraps. Fold to create zigzagging supports for land masses. Mark guidelines for areas of land on square with plywood insert on bottom, following diagram. hot-glue support pieces to base. Be sure you don't cover slot for volcano rock launcher or area for plastic container. Laminate and cut 1" strips for sides of land masses and hot-glue in place.
Throughout construction, tissue paper is applied to surfaces as follows: Cut general shape required plus 3" from tissue. Brush white glue on paper with 1" wide brush and position on cardboard. Tear additional pieces in other colors and glue on top, overlapping as desired to create different color effects. Paper can be gathered slightly to create surface texture in additional layers, but the first, overall layer should go on as smoothly as possible.
Cover area for river with purple and dark-blue tissue paper; place additional pieces diagonally to indicate flow of river. Color a few 38"-long pieces plastic wrap on one side with chartreuse, blue and gray markers, making color streaks.
Gather wrap lengthwise, shining with marked side down. Glue to river with rubber cement at ends only. Cover area; trim excess.
Trail white glue on edges oi 1" cardboard side strips. Place land masses on glued edges. Secure further around outer edges with hot glue.
Cut two 1" x 2" cardboard pieces with centered 5/8"-diam hole for headstand; glue to location shown in diagram.
Cover all land areas and slides with gold tissue paper.
Cut from cardboard pit frame D and cover with gold tissue paper. Hot-glue container bottom to area shown. Fil with Slime and cover with container top when not in use. Frame goes on top and is not attached.
Cut from cardboard seven A's, six B's and three C's. Score dotted lines on A pieces for bends (in plan the tops are shown, indication direction of bends). Cover these pieces with colors given on Plan View. Hot-glue bottoms in locations shown. Cover all pieces with more tissue paper in different colors, gluing ends to base to a pencil; remove and glue in place when dry.
For bridge make two long, narrow, twisted vines and glue in parallel lines 1 1/2" apart from land mass to land mass. Let dry. Make lots of 2"-logs vine pieces and glue across the two supports. Glue halves of self-fastening tape to ends of foilage above headstand and other halves to the rocks.
For volcano follow pattern to cut shape out at cardboard. Score outside on dotted line. Cut through for footholes and depressions. Push footholes and depressions inward. Hot-glue ends of volcano together. Cover with gray, purple and black thssue; cover inside at top with reds, pinks an yellows.Crush 1" to 2" plastic-foam scraps to form rocks; cover with tissue, using photos for color guides. Glue some rocks in depressions.
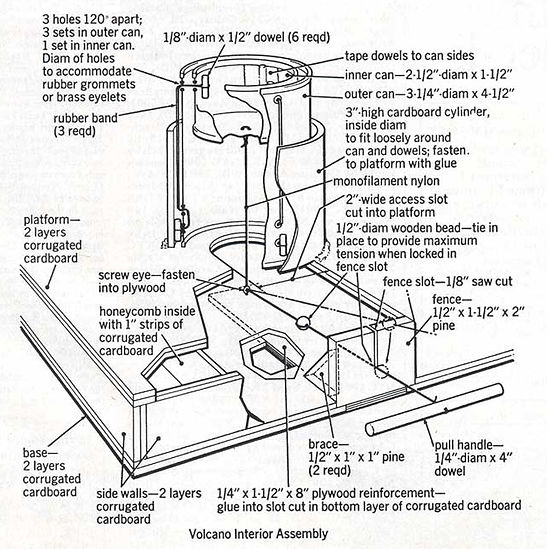
To make volcano rock launcher, cut out both ends of large can and one end of small. Remove labels; wash thoroughly. Drill holes as shown in Volcano Interior Assembly diagram(below) to fit grommets. Also drill two small centered holes in bottom of small can. (Grommets prevent sharp edges from tearing rubber bands.) Assemble with rubber bands and dowel pieces as shown, looping bands around dowel; secure dowels inside with bits of tape. Tie length of monofilament to bottom; test action. Set screw eye through cardboard into plywood. Cut and attach fence with slot and blocks with hot glue.
Surround with cardboard cylinder; hot-glue to base. Add bead to monofilament as required to make proper "cocked" position. Release action by flipping bead out of slot. Tie end of momofilament to dowel pull handle as shown.
Fill can with rocks. Place volcano on top (it is not attached).
Background
MATERIALS:
4 sheets 28"-square corrugated cardboard;
2"-wide paper packing tape;
1 roll 18"-wide white heavyweight glazed shelf paper (roll is 11.7 yd);
spray adhesive;
permanent wide tip markers in black, purple, blue, turquoise, hot pink and yellow;
silver glitter;
white glue.
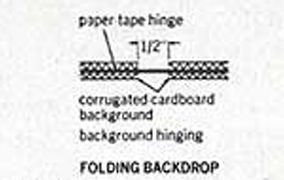
Tape two cardboard sheets together, leaving 1/2" space between to form hinge as shown in diagram.
Turn over and cover space with 1/2"-wide strip cut from 2" tape. Turn and glue other two sheets on top of taped sides. Cover all sides with shelf paper, using spray adhesive.
For Hoth side lightly pencil several large cloud-like formations. Cover these formations with looping scribbles in blue and turquoise, allowing colors to overlap somewhat to blend them together. Leave tiny dots of white showing through for stars. Color in between areas with purple scribbles. Go over purple areas with black. Brush with white glue and sprinkle with glitter 'while still wet. Allow to dry.
For Dagobah side mark supernova (to be lett white in center) and spiraling areas of yellow (as shown in images). Follow same procedure for marking, using red, pink and yellow. Do not apply glitter to this side of backdrop.